Sunday 22 December 2013

Shape biscuits

Christmas shape cookies - Steph's Kitchen


Shape biscuits are something I have fond memories of from when I was only a little girl. We'd spend the afternoon with my Mum - cutting out various shapes from the dough, baking them, and then icing them a range of colours.

My family are visiting this Christmas so I decided it would be a bit of fun to make Christmas shape cookies. Now I hope you're not thinking fancy iced cookies that time all this time and effort to make - No, these biscuits are all about having fun with those you are baking with. It's about family! They are so simple to make, and just so much fun. This shape biscuit recipe is an adaption from the one my Mum still makes today.


Christmas shape biscuits

The number of biscuits this dough makes depends on the size of your cookie shapes.

3 Tbsp margarine*
1/2 cup sugar
2 tsp vanilla extract
1/2 tsp cinnamon
1 cup plain flour
3/4 cup S.R. flour
2 Tbsp corn flour
1 egg
1 Tbsp milk (extra to glaze)*
pinch of salt

* If you would like to make these diary free use a dairy free spread instead of margarine, and rice or almond milk instead of the milk.

Preheat your oven to 180 C / 350 F.

Cream your butter and sugar as you would for making a cake. Next add in your vanilla, cinnamon and egg, beating until well combined. Sift all three flours together before adding it into your mixture 1/4 cup at a time. About half way through adding your flour, add in the milk and salt. Continue adding the rest of the flour until it forms a cookie dough.

Sprinkle a little bit of plain flour onto your bench and knead your dough until smooth. If your dough is sticking to your fingers or the bench, sprinkle a little bit more flour. Before rolling out the dough I always like to sprinkle the bench again over the area I will be rolling it out on. I find this helps later when I am cutting out the shapes. Roll out the dough to about 1/2 cm thick; with all the flour and egg in the dough they will rise higher once baked.

Cookie dough for shape biscuits - Steph's Kitchen


Line a cookie tray or large baking tray with grease proof baking paper. You can simply grease the tray with something like spray oil but I find that it's easier to use baking paper. Using cookie cutters, cut out your cookie shapes one by one. A little trick that I think my Mum taught me: after pressing in the cookie cutter turn it backwards and forwards slightly a couple of times. This cuts the shape fully and makes it easier to remove from the dough. Once you have cut out as many shapes as you can, place the shapes onto your tray and lightly knead the remaining dough back into a ball. You don't want to knead the dough too much as the biscuits will be tough. You want to knead the dough only to get the dough pieces to form a ball that you can roll.

Roll out your dough again and cut out your shapes; continue this until there is not enough dough left to create another shape. At this stage I just eat the left over dough (I know terrible), but you can simply throw the left overs away.

Cutting out star shapes in the cookie dough - Steph's Kitchen


Place the cookies into the oven for 10 - 15 mins or until golden brown; how long really depends on the size of your cookies. I find that small cookies only take around 8 mins, where as larger ones needs closer to the 15. Once cooked allow your cookies to cool completely on a cooling rack.

For the icing simply make a simple icing like this Easy Cookie Icing. I simply use food colouring to make whatever colours you would like. My Mum used to make one batch of icing and simply divide it into different bowls and make the different colours for us kids. The icing and decorating is the best part of these cookies I think!

Enjoy!

Steph xo

Tuesday 17 December 2013

Putting on my Santa hat for Operation Santa


Operation Santa


I can't believe it's almost Christmas. In a mere week I have so many bits and pieces to buy, and a Christmas menu to finalise! Ticking off my Christmas gift list while I push away stressful thoughts about my in-laws and parents meeting for the first time, I start to think about what this festive season really means.

We all love Christmas (well, I know I do) – with the gift giving, a decadent abundance of food, and celebrating with family and friends. As a society we love Christmas so much that Australia alone is set to spend $32 billion on Christmas this year – that’s $1400 per person on Christmas alone.

Then I had a bit of a guilty moment – here I am stressing about appearances and people getting on, as though it’s the biggest problem in the world, when there are people out there who can only dream of having a Christmas this year!

Operation Santa has distributed more than 1.8 million giftsNow I’m not saying that we should all give up Christmas and not celebrate the season, but this year I decided to put my “first world problems” aside, put on my Santa hat, and bless someone that otherwise wouldn’t have a Christmas by getting involved in Operation Santa.


For those not familiar with it, Operation Santa is a Christmas appeal run by UnitingCare Australia in conjunction with Target. You've probably seen the big gift tag decorated Christmas trees outside your local Target store. In its 22nd year of operation it has distributed more than 1.8 million gifts to people in need in the local community. The appeal is all about the gift of gift-giving, allowing you to take a gift tag and leave a donated gift under the tree to someone less fortunate.

Some of you might be thinking “But I don’t have the money to go and spend all this money on someone else?”

Just like with everything, it’s the small things in life that can make a huge impact.

I think this quote by Charles Gibson (the UnitingCare Victoria and Tasmania Director) sums it up:

“For families doing it tough, being able to share the experience of gift-giving can have a huge impact. With Operation Santa, you can give a sense of dignity and joy to people who would otherwise have to go without presents this Christmas.”

I don’t have a lot of money, nor am I going to crack out the credit card and buy the biggest gift possible to make up some karma points. I’m going to give something small, that I know I can manage, and I know that although small it’s going to brighten someone’s world. And isn’t joy what Christmas is all about?

Gift tags for Operation Santa
So I’m spreading a little bit of joy this Christmas, and although I’m only one person at least I know I’ll be making a difference to one person’s life.

If you’d love to join me Operation Santa runs until the 23rd December, with gift tags available at any Target Store. If gift giving is not your thing but you still want to help those have a Christmas you can also donate to the appeal on their website www.operationsanta.org.au.


Steph xo


Images courtesy of UnitingCare Australia.

Saturday 7 December 2013

Roast chicken with apple and thyme stuffing


Roast chicken with apple and thyme stuffing - Steph's Kitchen


With Christmas almost here I've been slowly putting together my Christmas lunch menu. I'm really excited this year because my family is flying in to spend Christmas with us, and it'll be the first Christmas I've been able to have with them in five years. It hasn't been that we didn't want to spend Christmas together; the last few years have been filled with expenses that just haven't enabled us to fly back to my home town.

Although my Christmas menu does seem to chop and change often, one thing has stayed on my menu from the start: Roast chicken with apple and thyme stuffing. The stuffing is a variation of what my Mum used to do for a quick stuffing. She would chop up onion and apple and stuff it into the chicken with some bread to make a sweet chunky stuffing. Funny enough before Mum started doing this I never considered apple with chicken, as I thought it was a pork thing - but it goes amazing!

Apple thyme stuffing for roast chicken - Steph's Kitchen


Over the years I have adapted the stuffing to be even more lazy then my Mum's quick stuffing. I know use my food processor instead of cutting up anything, which also allows me to not use any water as the apples use the moisture to bind everything together. You'll see what I mean when you read over the recipe. You can literally have the stuffing ready in under five minutes, even making it up a head of time and keeping it in the fridge. The stuffing also uses five very common ingredients.


Roast Chicken with apple and thyme stuffing

Makes enough stuffing for a 2 - 2.5 kg ( 4.5 - 5.5 pound) whole chicken

In my experience a 2 kg chicken will feed around four adults with your roast vegetables and the other usual suspects for a roast dinner.

For the apple and thyme stuffing

1 medium onion, peeled and cut in half
2 slices of thick bread (I use white bread, but you could use whatever you like)
1 large apple / 2 small apples (green or red) - peeled, cored and cut into quarters.
1 small bunch of thyme, with leaves removed from thicker stems
2 small sprigs of parsley (around 5g of leaves)
A little bit of pepper

Ingredients for the apple and thyme stuffing - Steph's Kitchen


Pre-heat your oven to 180 C / 350 F.

In a food processor throw in your onion, thyme and parsley. Turn on the food processor and blend until the onion appears to be finely chopped. I like to add the onion in first so that you don't even up with larges chunks in your stuffing while everything else is finely cut. Next add in the apple followed by your bread torn into large pieces. I like to add a little bit of pepper to my stuffing but like to leave out the salt. I do this because I find it doesn't need it, and I try not to use too much salt in my cooking. Blend again until everything is mixed through and is finely cut. The apple in the stuffing will at that little bit of moisture you need to keep it all together, so you don't need to add any other liquids like you might have in other stuffing.

Before stuffing the chicken I like to rinse it first under some lukewarm water. I like to rinse out the chicken cavity as well to make sure there isn't any blood or things inside before my stuffing goes in. This is a personal preference so you don't have to do this step.

To stuff the chicken I like to use the bowl from the blender to prop the chicken up onto. Remove all the stuffing from the food processor bowl into a small bowl, then prop the chicken on top so that you can easily stuff the chicken. Pull the fatty bits on the sides of the opening to the side as we'll use them to close up the chicken later. Once you have added all or as much of the stuffing as you can pull the fatty skin on the sides over each other to close the opening as much as you can, even pulling them together tightly so that as little of the stuffing is showing as possible. Use toothpicks to pin the sides together and over the opening. Others might use cooking twine but honestly that is too much effort for me.

Closing the opening of the roast chicken - Steph's Kitchen
 

In a large baking dish place a sheet of baking paper on the bottom, making sure that it sits up over the dish at least by a couple of centimeters. You don't have to put the baking paper down but I just find that it makes things easier later on to clean up, as you don't have things baked onto the bottom of your tray. Having that extra baking paper sitting over the sides of your dish also stops oil spitting up onto the sides. Before popping it in the oven I simply drizzle a little bit of olive oil over the top, rubbing it into the skin of the chicken so that it's all over, and then sprinkle little bit of salt and pepper over the top. You can also sprinkle with a little bit of thyme as well.

A good rule of thumb for chicken is cook it for 40 mins on 180 C (350 F) for every 1 kg. As we use a 2kg chicken for this recipe we bake the chicken for 80 mins. However, with chicken you always need to check the chicken is completely cooked through. It isn't like beef where it can be still "pink". To check simply take a skewer (or small knife if you don't have one) and pierce the chicken through to the meat. Remove the skewer and see what colour the juices are that run out. If the juice has any sort of red or pink colour to it, cook it for another 15 mins and check again. If the juices run clear you know your chicken is ready.

Before cutting the chicken make sure you rest it for at least 10 - 15 mins. You might think resting is just something that chefs rant about as being the "proper way" of doing things (like I used to), but if you rest it you won't have all those juices leaking onto your serving plate and creating a pool of liquid under your meat.


And that is that! It is always so easy, and just tastes so good. I like to serve mine with gravy as well, but you really don't have to; my family is English ... gravy comes with everything!

Enjoy!
Steph xo

Sunday 1 December 2013

Chewy gluten free choc chip cookies

Chewy gluten free choc chip cookies - Steph's Kitchen

Heading into the Christmas season always means more entertaining and catching up with family and friends. Recently we were invited to a Christmas BBQ at a lake side park. Straight away my mind went to some sort of sweets for everyone to enjoy – even though I was only supposed to bring a salad. Then I remembered there would be some people going who are gluten free …

I haven’t really made anything gluten free before so I set off to learn the do’s and don’ts outside of my general knowledge of gluten. Interesting enough I found out that I had to be careful about buying things labelled “Gluten Free”. Sometimes things like baking powder say they are Gluten Free but then when you look at the ingredients they are wheat based. As a rule of thumb it was recommended that you always check the ingredients and check there is nothing wheat based included – even looking at things like flavouring or preservatives. I found out that even though coco is gluten free it also depends on the brand. Some brands of cooking chocolate also had warnings about containing gluten, where as if I was to buy the same brand but as melts or choc chips it didn’t. I could have been super paranoid but if it had a warning I would not get it; I thought it was better to play it safe.

I had everything planned out to adapt Donna Hay’s brownie recipe into a gluten free version when I remembered brownies were “the thing” of another girl attending – and you don’t want to appear like you are trying to out-do someone! So I decided to adapt my choc chip cookie recipe to make it gluten free.

Off to the shops I went, checking my ingredients as I went to ensure I wasn’t just assuming they were gluten free. I decided to simply use gluten free flour instead of a rice flour and almond meal combination. I ticked everything off the list and headed home, very proud of myself.

I began to get everything out for my cookies when I realised I grabbed gluten free plain flour instead of SR flour!  I almost ran back to the shops when I noticed a chocolate choc chip cookie recipe on the back of the White Wings flour packet. So I decided to merge my recipe with their recipe to create my own cookies. They turned out so yummy! (Thanks White Wings for saving the day)

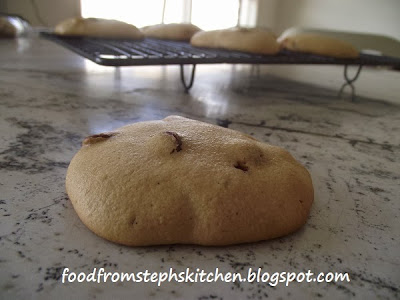
Chewy gluten free cookie - Steph's Kitchen


Chewy gluten free choc chip cookies

Adapted from White Wings chocolate choc-chip cookies and my Mum’s choc chip cookie recipe
Makes 20 medium sized cookies

If you don’t want gluten free cookies simply switch the gluten free flour with plain flour.
 
125g margarine, melted
1 cup brown sugar
1 Tbsp (15ml) vanilla extract
2 cups gluten free plain flour
50g white choc chips
50g milk choc chips
3 extra large eggs
 

Firstly (before you forget) preheat your oven to 180 C / 350 F.

In a large bowl mix the eggs, sugar and vanilla extract until the eggs are whisked and everything is well combined. Next add the melted margarine. You could use butter but I just like using margarine in cooking more than butter. Sift the flour in a separate bowl and then add it to the egg and butter mixture, about ½ a cup at a time, mixing it until it is smooth each time. Finally add the chocolate chips and mix them through.

You might be looking at the mixture right now and thinking it is way too runny to be cookie dough. Don’t worry I was thinking the same thing when I made them, but it’ll turn out delicious. Instead of rolling the dough like you normally would, you spoon it. Cover two large baking trays with grease proof baking paper, and then spoon dessert spoons of mixture onto the tray; make sure you leave room for the cookies to spread. You might not be able to spoon all the mixture onto your trays. If this is the case simply cook the cookies in batches, adding new baking paper each time.
 
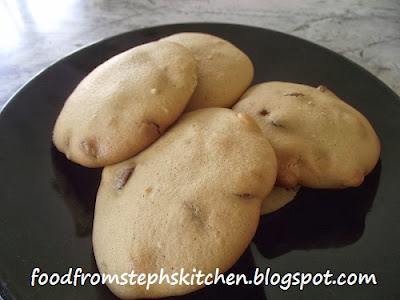
Plate of chewy gluten free choc chip cookies - Steph's Kitchen

Bake the cookies for 10-15 mins, making sure that the cookies are firm to touch. Place your cookies on a wire rack to cool – or you can eat them while still warm!
 
I thought I would make these the first of my Christmas recipes as I just love making little gift bags of cookies for Christmas gifts. I simply make mini cookies instead of large and wrap them in cellophane, finishing off with ribbon. I also think using the normal sized cookies and wrapping them in the cellophane to make a bon-bon is great as well. I just love gifts that are home-made like that; you know someone has gone to that extra effort.

Enjoy!

Steph xo